
Once upon a time in ancient Egypt – around 3000 BC – humans felt the need to communicate and document their experience by writing on papyrus; where the word paper came from. This papyrus was obtained from the stem of a plant that abounded on the banks of the Nile River. It is noteworthy that in China – around 200 BC – paper was being manufactured from silk waste, rice straw, hemp, and cotton. There is also archaeological evidence that the Maya developed paper – since the beginning of the 5th century AD – using the bark of trees.
The manufacture of handmade paper has not changed much since its inception and today the making of handmade paper remains in an interesting evolution. Besides being a way to care for our planet because it stimulates recycling, it is also an activity carried by many; among these, cultural enthusiasts and artists. For many of these, handmade paper is an important tool in their work, given the creative possibilities it can provide. For example, a handmade paper can be plain or it can have different textures and colors particular to each papermaker. With it, it is possible to give tri-dimension to a drawing, to change the color of a picture printed on it or give to it its details. One can also make cards, masks, sculptures… and, of course, books.
One simple way of making paper by hand requires the following materials: water, a sponge, prime matter, a deckle, cardboard, an iron, newspaper, wood blocks, a blender, and two shallow containers. It is important to place these on a flat surface such as a table, being near a sink and close enough to an electrical outlet.
The mold may be formed by a frame – which is called a deckle – a wire grid and firm mesh; three equally sized pieces. The frame could be made with wooden bars and should be somewhat deep. Wooden photo frames can serve as a frame. Even a shoebox, if its bottom is removed, functions as one. The size and shape of the frame will depend on the size and shape which one wants to give the paper. It is advisable to start making paper with a small mold – 5 x 7 – to practice maneuvering.
On one side of the frame, at its top and bottom and near the edges, two Velcro straps going from one side to the other could be attached. These can serve to join the wire grid and firm mesh to the frame. If the grid and the mesh are firm, the Velcro is not essential. The mesh should be placed between the frame and the grid.

It’s good to make sure the wire grid has tiny holes to hold the pulp, but which can also drain the water. The mesh should have small ones but not as small as the holes of the wire grid. Both, wire grid and mesh – or things similar to these – are available at most hardware stores.
Once the mold is made, it is necessary to select the prime matter and cut it into small pieces; bearing in mind the texture and color that you want to give the paper. The amount of prime matter used must cover the whole wire grid and be a little longer than it; ¼ longer. This varies according to the thickness of the prime matter. The more familiar the papermaker becomes with the process, the more strategies will be learned; but this is a good suggestion to follow.
The prime matter one should start making paper with is recycled paper; as we know quite well its reaction to water. Or who hasn’t ever had an important paper mistakenly soaked in water and had to run to dry it hoping it would not end up playing the role of tissue paper? Thinking that matter is not destroyed, but transformed, if for example tea bags are used to make paper, the paper made would be similar to a tea bag. If leaves are used, the paper will have similar characteristics to them.

Once decided how they paper should look, the prime matter – cut into small pieces – is to be placed inside a blender. If the mold is 5 x 7, one would add to the blender from 2 to 2 ½ cups of water. If it measures 8 x 11, 3 to 3 ½ cups should be added. And so on. If one is going to include colored paper, this should be processed separately. Color can be added into the blender with watercolors, acrylics and vegetable dyes, among others. Then, the prime matter is blended. It usually takes about 10 seconds at high speed. Everything depends on the blender, the volume of the prime matter and the thickness that one wants to give the paper. When one can see that the pieces have become pulp – that is, having a consistency similar to oatmeal – one can make paper.

Now, let’s put our hands to work on handmade paper!
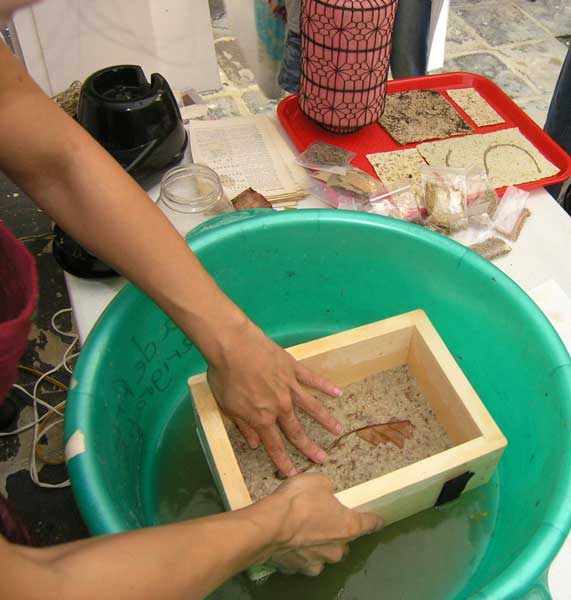
I – Fill ¾ of one of the containers with water, so that the mold can dive into the water and still leave enough room for only the bottom of the mold to touch the water. That way, we can move the pulp with our hands.
II – Add gently the pulp to the mold introducing it into the container.

III – Fully enter the mold inside the container, about five seconds, while spreading the pulp throughout the mold. If it’s not enough pulp, make a little more and add it.
IV – Lift the mold out of the container, leaving only the bottom of it touching the water. Move the pulp with your hand to distribute it evenly.

V – Remove the mold from the container and let it drain.

VI – Remove the frame carefully and place the paper on cardboard, leaving only the wire grid below it, and place another piece of wire grid on top.
VII – Extract the water from the paper through the wire with a sponge putting it across firmly, consistently and horizontally. Keep squeezing the water from the sponge in another bowl, until you cannot squeeze more water out of the sponge.
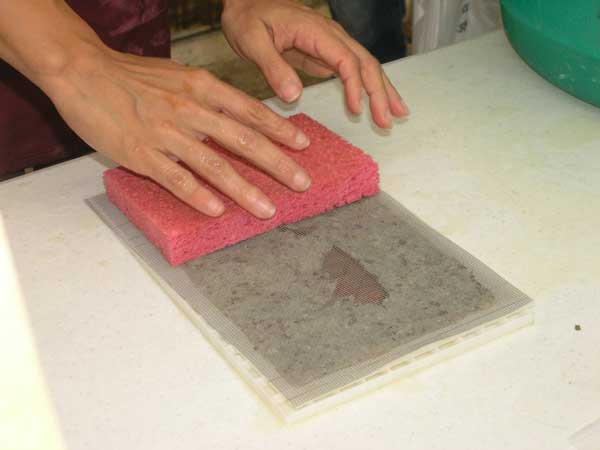
VIII – Carefully remove the wire; place a piece of cardboard on the paper and turn it around completely. Then remove the wire.
IX – Cover now this side of the paper with another cardboard and press all with a block of wood, also in a firm, consistent and horizontal manner, until there’s no more water.
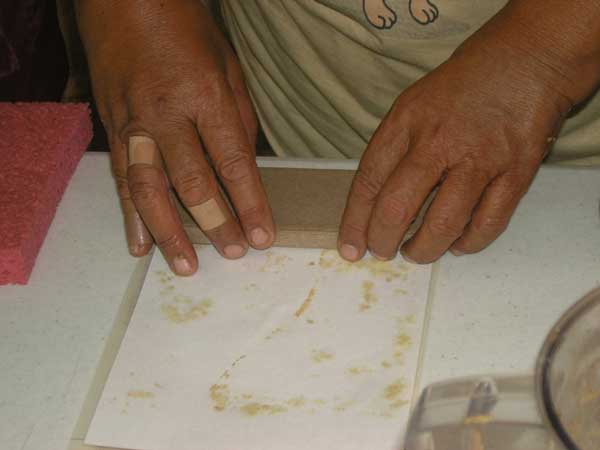
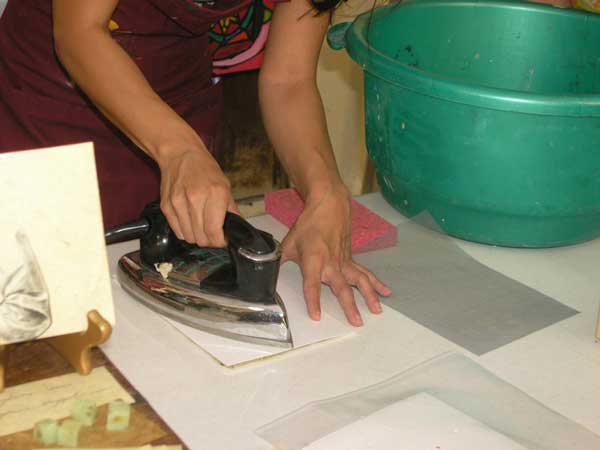
X – Remove cautiously from the paper the cardboard that is still somewhat wet, turn the paper over onto another cardboard, put another cardboard over it again and with a warm iron finish drying and flattening it. It is desirable that every time a cardboard is used, to put it away immediately so that it dries and we can reuse it soon.
If we want to incorporate decorative elements (leaves or dried flowers, vegetable fibers or natural herbs, copies of photographs, words or other things) these should not be crushed as part of the prime matter but incorporated into the pulp in step IV.
It is important to note that drying handmade paper varies depending on the ambient temperature. Therefore, it’s recommended to set a place apart for drying. If time is of the essence, the sun is on our side, and we don’t need our handmade paper to be smooth nor flat, steps IX and X may be omitted. It is then a matter of letting the paper dry in the sunlight and begin the steps again; another pulp, another paper. Little by little we’ll master the art and speed up the process.
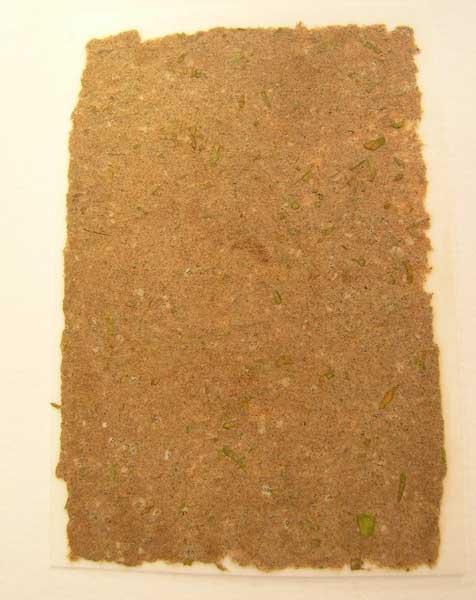
Hands down, we are ready! Making handmade paper does not require a large infrastructure or a piercing economic investment and it could even become a source of income. You can build a small workshop with very few resources. And it is not a closed trade; rather it is an open proposal for everyone to bring in their particular vision. Each sheet of handmade paper is unique; it is sometimes support for a work of art and – at other times – an artwork in itself. It all depends on the role you want to give your paper. Then, why not try? Everything begins once upon a time.
For more information, see Aydasara Ortega at the Toque de Queda Facebook Page!
kathleen deyo says
Gorgeous article and explained to me what I did wrong when I made my first attempt at making paper (no frame)…now I will try again!
Ashley Zaccaro says
I love this!! Reminded me of when I made paper growing up. It really is beautiful.